Monday, July 12, 2010

Fun Project For Mom

Homemade Ugly Dolls


This can be a really fun and easy project once you get the hang of it. Me and my daughter were making paper dolls out of felt paper one day and the next thing you know I realized I had made a homemade "Ugly Doll". I had a few more to show online but I've given them all away. All my family and friends are always asking me to make them. And the more I make the better I get!


It's pretty simple but you must be patient! I usually sit in bed and spend an hour a day on it. They usually take me 3 days for one because I'm sowing by hand but if you have a sewing machine you can probably get through this quickly.

- First cut a paper doll or you can be really creative. It can be an odd shape oval with arms, legs or alien looking ears. But you must cut the same exact body so cut 2 dolls.

-After cut 2 round eyes. I usually cut one bigger then the other to give it personality. You should have 4 eyes all together. Two for each doll.

- ( The eyes) I sow an X on one and sow a button on the other.
-( The mouth) I stitch a Frankenstein inspired mouth, I sow a long black line and after small vertical lines or you can make x's.

*You wanna sow from the other side of the felt so your knots or not seen.

-( The belly) stitch in colorful different size buttons or beads. You can make clothes, patches, go crazy if your having fun go for it. I've been cutting out letters to represent the kids name that I'm giving it to. ( This one below has an L for Logan.)

To finish sow together and but leave a small pocket to fill with doll filler. You can stuff it with anything soft. And I use a pencil or wooden dowel to push through the smaller areas.


Like I said Patience is key!! :)
It's basically sewing a two sided fabric doll or gingerbread man from scratch. What I love about this project is you can be as creative as you want to be and the more you make the better you get. And their great gifts. I've made 6 so far and think I've almost mastered it. Have Fun!


Jellyfish and Other Foamy Things

Pipecleaner Jellyfish
inspired by the book,
I'm the Biggest Thing in the Ocean by Kevin Sherry


Easy To Do Jellyfish

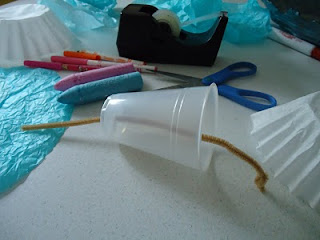
Materials: Coffee filters or Tissue paper, Plastic cups, Markers, Pipe cleaners, Spraybottle, and scissors

The first step is letting your child go wild and be creative. Use markers to draw and decorate their coffee filter. The other option is to cut medium size circles out of tissue paper. Ask them to you use underwater colors like blue, purple, pink, yellow or green.
After pop a small hole in the top of your plastic cup and push a pipecleaner through. Don't forget to make a small knot on the end :) Slide your coffee filter on the other end and spray a small amount of water on it. The colors from the markers will run creating a tie dye effect and Voila' ! Homemade Jellyfish!


And Other Foamy Things...


Popsicle Stick Flowers, Butterflies and Summertime Picture Frames- All created with foam paper


Hope your having a great Summer!!

The Artist And The Teacher


Friday, June 25, 2010

Summer Shells

What To Do With All Those Summer Shells!!??


 Ideas For Decorating With Shells- Glass Candle holders, Bowls, Baskets and Flower Pots

After a long day at the beach we come home with sand in our shoes and a bucket full of shells. I always have a great time trying to figure out what to do with them. I love shells their so pretty and come in different shapes and sizes. They also hold precious memories of walking on the beach or bay.

I think I've pretty much mastered what to do with shells haha. I've put them in baskets in the bathroom, old brick or brack, glass bowls or tall glass candle holders. In the summer I put them in the bathroom and it gives it a beach feel and my guest love it, they think I'm so crafty. haha And for last minute decorating I put them in a bowl with water and light candels for dinner time.

*Julia loves to place them in the garden around flowers and in pots. And I think later on we'll try to paste googly eyes to make some shell people. ( I'll try to post some pictures and show how that turned out :)


Easy and Fun!

Outdoor Beading and Jewelry Making

Materials- Crafting Wire/Pipe Cleaners and Different types of beads

For me June is all about jumping around! My daughter has just finished school, starting camp, weekend vacationing, barbecuing, beaches you name it. But it's a great time for summer crafting. Yesterday I was running out the house to get to the park early but had time to grab some wire, beads and pipe cleaners in my bag. Why I feel this is such a great summer craft? You bring it anywhere! And it's guaranteed to make you friends. As we sat on our blanket beading necklaces and bracelets curious kids couldn't help but to come over and wanna join in. 

This is great for picnics, bonding and haha great for calming your kid after a exciting sugar filled day.


Wednesday, April 14, 2010

Spring Has Sprung

A New Leaf


Where do I begin? Well alot has happened for me and to me. But all for the best. I'm continuing to work on art and pursue new projects. But my heart keeps pulling me in different directions. I have a strong connection with myself, spirituality, nature, music, art, life and people. So I see alot of travel and self learning in my future. And I hope to keep you posted as I create and grow.


Yes Spring has Sprung! Finally!! It was a pretty long winter and we were so excited to clean the yard and plant seeds in our garden. Instead of buying plants and flowers from our local nursery we are planting everything from tiny seeds, painting rocks and stones and decorating with shells and knick knacks. I guess were growing love.
Julia had a week off from school for spring break and I really wanted to take a trip somewhere warm. But money was tight and we found so many fun things to do in New York. We worked on art at home painting pictures about spring, we also visited the CMA (Children's Museum of Art) in Manhattan, visited the Staten Island Zoo, and went to Julia's favorite park Rockefeller Park near downtown Manhattan. So we had a very productive week and every night we fell fast asleep.

Julia's Spring Painting- Created withTempera Paints- we used Q tips and paintbrushes

Children's Museum Of Art

Our Flags
Made with Cardboard, Glue/Stapler, Different Colored Fabrics, Buttons, Sequins and Glue


 Positive and Negative Shapes & Printmaking with Rubberbands and Blue Ink

Fun At The Park

 Graffiti Art in The City


Happy Spring Everyone!

Wednesday, January 13, 2010

Look who came for a visit

We live near a nature preserve and we have the most beautiful cardinals and blue jays that fly by. But we also have 8 or 9 roosters and chickens living around the corner. And it's really funny because sometimes they'll get loose and stop traffic and I'll have shoo them to safety. Yhea people get a good laugh when watching.
But this week 2 or them figured out how to get loose and walked around the corner and have been hanging out in front of my home. They love corn and sunflower seeds and are very friendly. You really cant catch them because their fast runners. But they have no problem getting close if your feeding.


And yes this little guy had no problem waking me up for work this morning. :(


Baby It's Cold Outside!

Snowflake Suncatchers
How do you make fun of the cold weather? Winter Art!

-Construction paper, Contact paper, Tissue Paper/Confetti & Scissors
I totally grabbed this project from Frugal Family Fun Blog. I'm a big fan of any site that shows me how to create projects on a budget. A big +


This is a really easy project but I did precut the snowflakes for the kids. After they enjoyed cutting tissue paper to make confetti and sprinkled it over the contact paper. And Viola' ! Yes this project is great for making hearts for Valentines Day or Shamrocks for St. Patricks. It's so much fun and inexpensive to do. And I really love how brightly the colors shine through.


Monday, January 11, 2010

Last Minute Project

 Buildings
-Construction paper, Colored Chalk or Pencils, Scissors & Watercolors
This is an easy project I'd like to share. I found some chalk in my art supply closet and thought it would be great idea to have the kids cut out some buildings and draw in some windows. After the kids glued it to their paper and they filled the backround in with watercolors.


You can really get creative with this one. When the paint dries you can cut out a sun, trees or people. I'd like to try this again in the future. Maybe make a large mural on butcher paper. But enjoy!

Tuesday, January 5, 2010

This Works Well With Music

A Little Bit Of Kandinsky
Yesterday we spoke about the artist Wassily Kandinsky a Russian abstract artist. I tried to talk about movement and shapes with the children. We danced in cirlces and made movements with our arms. I wanted them to create movement in their art. I found this project straight from Deep Space Sparkle Art Lessons for Kids: Kinders paint Kandinsky. I love this site.

Dancing With Circles
 - Black/White Paper, Colorful Stock Paper, Glue Sticks and Scissors
I had the children cut circles in different sizes and then glue them on their paper.
So red dances with yellow and black dances with purple etc..


The older children painted their Kandinsky's.


It's Hard Work But Somebody's Got To Do It!